Difference between revisions of "Invoke"
m (→Optimum invocation schedule: typo, wording, ...) |
|||
| Line 24: | Line 24: | ||
* [[The Orb of Detection]]: toggles invisibility on/off. | * [[The Orb of Detection]]: toggles invisibility on/off. | ||
* [[The Sceptre of Might]]: toggles conflict on/off. | * [[The Sceptre of Might]]: toggles conflict on/off. | ||
| − | |||
* [[The Mitre of Holiness]]: boost in spell energy. | * [[The Mitre of Holiness]]: boost in spell energy. | ||
* [[The Heart of Ahriman]]: levitation; you can stop this levitation with '>' at will, or by invoking the Heart again, providing no other levitation sources interfere. | * [[The Heart of Ahriman]]: levitation; you can stop this levitation with '>' at will, or by invoking the Heart again, providing no other levitation sources interfere. | ||
Revision as of 18:13, 29 April 2011
The #invoke extended command allows you to activate certain objects. The only objects that can be activated this way are crystal balls and most quest artifacts.[1]
Artifacts tire after you invoke them, and you cannot do so again for rnz(100) turns (averages 100; can be up to 2000, but 95% of the time it is less than 400). If you invoke again too soon, "You feel that the <artifact> is ignoring you" and 3d10 turns are tacked on to the wait time.[2]
Contents
Optimum invocation schedule
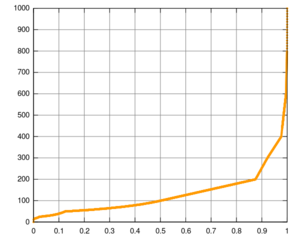
Invoking strategy is basically a trade-off between the risk of getting nothing and waiting too long. The turns to wait after a successful #invoke versus probability of success are graphed below (assuming your experience is <=17):
If you need the artifact reliably, such as emergency healing from the Staff, you should treat it like prayer - #invoke only in dire need. If you want a simple strategy for the most successful #invokations per turn, e. g. charging lots of wands with the PYEC, you should wait 78 turns between invocations. This yields an expected wait of 180.83 turns. If you miss the time a bit, the rate of success does not go down much. Your experience level does not matter.
The optimum strategy is waiting
82;81;68;81;88;67;54;96;78;62;88;81;65;63;81;65
turns after consecutive failed #invokes and restarting the list after successes. This yields an expected wait of 180.2354 turns.
Robert Tupelo-Schneck, of liquid diet tourist fame, has computed these numbers.
Minimizing the expected wait between success is the same as maximizing the expected rate of success per turn due to the Renewal Theorem.
List of possible invocations
- The Eye of the Aethiopica: branchport to another dungeon branch.
- The Eyes of the Overworld: provides enlightenment.
- The Staff of Aesculapius: heals half HP damage, cures sickness, unblinds, unslimes.
- The Orb of Detection: toggles invisibility on/off.
- The Sceptre of Might: toggles conflict on/off.
- The Mitre of Holiness: boost in spell energy.
- The Heart of Ahriman: levitation; you can stop this levitation with '>' at will, or by invoking the Heart again, providing no other levitation sources interfere.
- The Platinum Yendorian Express Card: charges objects like a scroll of charging with the same blessed/cursed status. Only Tourists can perform blessed charging.
- The Orb of Fate: level teleport.
- The Longbow of Diana: creates 7-16 uncursed arrows if uncursed, 7-21 blessed arrows if blessed, 6-11 cursed arrows if cursed.
- The Master Key of Thievery: untraps boxes and doors with 100% success.
Invoking a non-artifact crystal ball is exactly the same as applying it.
List of possible invocations for new SLASH'EM artifacts[3]
- The Candle of Eternal Flame: summons a (tame) fire elemental.
- The Eye of the Beholder: reduces all non-undead monsters in eye's line of sight to 1/3 HP and reduces luck and alignment by 3 with luck above -9. Instadeath with luck below -9.
- The Gauntlets of Defense: toggles invisibility on/off.
- The Great Dagger of Glaurgnaa: boost in spell energy.
- The Hand of Vecna: summons 4-7 tame graveyard creatures and reduces alignment and luck by 3 with luck above -9. Does 5-24 damage to player with luck below -9.
- Holy Spear of Light: creates a lit field of a 12 square radius. This damages undead and demons in a 9 square radius.
- The Storm Whistle: summons a (tame) water elemental.
